2/12/2022

Sale-a-brations Sunshine & Rainbows DSP!!!

 YOU MAKE ME HAPPY!! 


It is a wondeful thing when Stampin'Up! coordinates the sale-a-brations with the catalog items. 


This is one of those cases!  The FREE with purchase Sunshine & Rainbows 6 x 6 DSP coordinates with the Rainbow of Happiness Bundle in the mini catalog!! What a great way to get it all!!!


YouTube video


I started this card with a Misty Moonlight card base measuring 4-1/4" x 11". I scored this on the long side at 2-3/4" and 5-1/2". 
There are 3 pieces of Basic White -- 1--( 4" x 5-1/4"), 1-- (3-1/2" x 2-1/2"), and 1--  (2-1/2" x 4")
There are 2 pieces of the DSP - 1--(3-3/4" x 2-1/4") and 1--(3-3/4" x 2-3/4")
You also need 1 piece of Magenta Madness measuring 3-3/4" x 2-3/4"


First thing to do is find the sheet of rainbows and cut one apart to use on your card front. 


Now you need to take the small rainbow die and die cut it out of the basic white piece measuring 2-1/2" x 3-1/2". then you can attach your rainbow dsp piece to the back of the die cut piece and stamp your greeting right below your rainbow. I also cut a second piece with the rainbow die out of my Misty Moonlight piece and added the piece for the second section covering the green. 


After you get this section assemble you can go ahead and complete the assembly of the card.


Make sure you only put adhesive on the left side of your Magenta Madness layer and center it with the card folded before attaching. 


Of course to complete the card I added some Wink Of Stella to the rainbow to give it that extra special touch. Sure hope you liked this card! It was fun to make and is going to make some people very happy!!!


Below is a list of supplies I used to make this card! 


2/11/2022

I ENJOY EVERY CHAPTER OF OUR FRIENDSHIP

 This single stamp is perfect for your cardmaking. You can stamp the image and leave it plain or step it up by coloring and layering. And the sentiment and image are perfect for your friends that like to read or not!! 


For this card I used Granny Apple Green for the card base and cut a piece of DSP from the Pattern Party hostess DSP pack at 5-3/8" x 4-1/8". The top piece is the largest die from the Scalloped Contours dies. I also cut a second piece from the basic white for the inside of my card too.


 I used a stamparatus to stamp the image just so I could make sure I had the image to the darkness I wanted and didn't have to worry about lining it up to match!


I used the blends in Pool Party, Real Red, Granny Apple Green, Pale Papaya, and Pumpkin Pie to color my image. I also added some Wink of Stella to the white parts of my pair of glasses to make it sparkle a little. 


Thanks for looking!!!


Below is a list of supplies I used! 


2/10/2022

Love is in the Air!!! Stampin Stray Ducklings Feb. 2022 Blog Waddle!


 Sweet Talk Suite Collection is amazing and I just can't get enough of it!!!


I got this card idea right out of the catalog!! (page 8) I love the detail!!


I started with a Blushing Bride card base. 

I cut a piece of the DSP at 5-1/2" x 4-1/4" and inked up the Gingham Embossing folder with the Blushing Bride ink pad and ran it through my Stmapin' Cut & Emboss Machine. 

I then cut a piece of Pool Party CS 4-1/8" x 3" and a piece of Shimmery White CS was cut using the Largest Die in the Stitched So Sweetly Die set. Using the Water Painters I did a watercolor wash on my Shimmery White piece using Pool Party ink. and then layered it onto the piece of Pool Party CS.

I then die cut out 2 mini envelopes from Blushing Bride CS and mini hearts fro Pool Party CS. The BFF heart was die cut out of the DSP. 

The sentiment for the front was stamped in Blushing Bride on a 1" square of the Shimmery White CS. For the inside of the card I cut a piece of Shimmery White CS and stamped the greeting in Blushing Bride. 


Here is a video with step by step directions.


Thanks for looking and don't forget to check out what our other Ducklings have done for our waddle!!


Here are the supplies I used: 


2/09/2022

Amazing Silhouettes Thank you card!

 This bundle is AMAZING!! 


The stamp set has three beautiful images while the coordinating dies have the words to go with it. This is the perfect bundle to make the perfect card for any occasion! 


I started with a Polished pink card base. The next layer is basic white measuring 4-1/8"  x 5-3/8".  The layer of the 2021-2023 DSP measures 4" x 5-1/4". The image is stamped on a piece of basic white measuring 2-1/2" x 5". I die cut the word Thanks from basic black and basic white and used the green glue to adhere the two together. 


Here is a video for step by step instructions. 


Thanks for looking! I hope you enjoyed this card. Here is a list of supplies used!


2/07/2022

sale-a-brate with Calming Camillia's You make me smile!


This is a FREE host set during our January 2022- February 2022 Sale-A-Brations!! This if free with a $300 party or order during the sale-a-brations period!!!


This is a beautiful card for any occasion. Thank you Mary Fish for the inspiration! 

This card also uses our Simply Marbelous Designer Series Paper which is also part of our 
sale-a-brations! 


The card base for this card is our Thick Basic White cardstock. The layers are die cut out using our Stitched Rectangles Dies. 

I used the stamparatus to stamp my image onto my piece of basic white cut with the second largest die and then popped it up with dimentionals. 

I heat embossed my greeting using the white embossing powder and popped it up with dimentionals. 
To finish my card I stamped the sentiment "It's the little things that make life great" on the inside. 


Here is my Youtube video :

If you are interested in getting this stamp set please let me know!!


Thanks for looking!! Hope you liked the card.
 Below is a list of supplies that I used! 

.If you are interested  in getting the Calming Camelia stamp set please contact me! 

2/03/2022

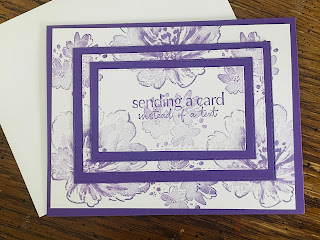
Sending a card instead of a text!!!

 This Flowing Flowers stamp set was not on my radar until I saw a card with this sentiment!


This is a wonderful sentiment in my opinion. Too many times texts become our only conversation. I have so many people I will be sending this card to. 


I started this card with a Gorgeous Grape card base. My next layer is basic white measuring 5-1/4" x 4". After stamping my images, the larger ones in Highland Heather and the smaller one in Gorgeous Grape, I then used the stitched rectangles dies to cut my layers. 


Here is my Youtube video with step by step instructions! 


I hope you enjoyed this card. Thanks for looking! 
Below is a list of the supplies I used!


2/02/2022

Halfway through sale-a-brations!!!

 We are halfway through our Sale-A-Brations!! Don't miss out!!!

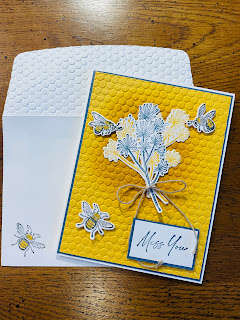
Miss You!!! with our Honeybee Home bundle!

Honey Bee Home Bundle

 This bundle is part of a mega Suite that has two bundles in it. There are so many wonderful products in this suite it is going to make you want it all!!!


The measurements for this card are:
Thick Basic White card base measuring 5-1/2" x 8-1/2" and scored at 4-1/4"
The Misty Moonlight layer measures 5-3/8" x 4-1/8"
The Bumblebee layer measures 5-1/4" x 4" and is embossed using the Hive 3D embossing folder. I also used a blending brush with the Bumblebee ink pad and sponged an area in the middle of my embossed layer to just add a little more depth and detail to make the flowers pop!!
The flowers were stamped in Misty moonlight and Bumblebee on basic white and then die cut out. I then tied a piece of baker's twine around it to make it look like a boquet. I did randomly add wink of stella to some of the flowers. 
The bees were stamped in momento ink onto basic white and die cut as well. I then colored the body part with my bumblee Stampin' Write marker and then went over the whole bee with Wink of Stella!!
The greeting is stamped in Misty Moonlight on a piece of basic white measuring 1" x 2" and layered onto a piece of Misty Moonlight measuring 1-1/8" x 2-1/8". 
.


I hope you like this card! Below is a list of my supplies used with links to my online store! 


Quilt cards!!

Beautiful Quilt cards using Stampin'Up! DSP I posted these a few weeks back on my facebook page and finally got around to making a video...