10/20/2021

Celebrate Sunflowers Fancy Fold

 Let's Celebrate with this Celebrate Sunflowers card!!

For this beautiful card I used both the Celebrate Sunflowers Bundle and the A Grand Kid stamp set. This is a special card for my niece who recently received the Sunflower Award at the Hospital where she works. 


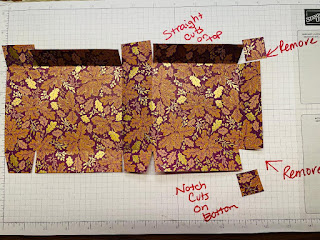
The measurements for this card are:

Early Expresso card base measuring 5 - 1/2" x 8 - 1/2" and score at 2 - 1/8" and 4 - 1/4"

You also need 

2 pieces of Cajun Craze measuring 4 - 1/8" x 5 - 3/8" 

2 pieces of  Very Vanilla measuring 4" x 5 - 1/4". 

You will need additional pieces of daffodil delight and early expresso to cut your sunflower from for the front of your card.

 For the greeting you will need  a piece of  crumb cake measuring 4" x 1-1/2" and a piece of  very vanilla measuring 4" x 1-1/4".


For complete instruction on making this card here is a video:


10/10/2021

October 2021 Stampin Stray Ducklings Blog Waddle!!


Welcome to our Blog Waddle!!

Our theme this month is Thanks. We have so much to be thankful for. I want to show all my friends and family just how much I love and appreciate all of them. So my project is a gift I plan to share with many. 


These cute little bags can be filled with chocolates or any other item that you would like your friends and family to have. The Blackberry Beauty DSP used to make these is the most beautiful paper with its multicolor leaves and golden accents. The sentiment from Pretty Pumpkins stamp set is perfect to let everyone know how thankful you are for them. 


To make this you start with a half of a sheet of DSP measuring 6" x 12" and score that on the long side at  1 & 1/2", 5 & 1/2", 7" and 11".
You then turn it and score the short side at 1" and 5". 


You then cut using your paper snips on short score marks, removing the right corners and notching out the other score marks on the bottom. 


Next you can fold down and fasten the top pieces showing the other side of your paper! 


Now, turn your paper upside down and fold back the side piece from where you cut out the square and add adhesive to the side piece and fold the box over to attach the sides. Then complete your box by fastening the rest of the bottom together and folding down the rest of the top flap! 


Once you have it put together you are ready to decorate it!! I heat embossed my greeting and added a bow


Hope you enjoy this project. I know my friends and family are going to love it!!


 Check out the other ducklings who are waddling this month!! So many beatiful cards and projects!!


Debbie Widener--YOU ARE HERE


DISCLOSURE

Images © Stampin' Up! 2011 & Debra Widener

Debra Widener, Independent Stampin' Up! Demonstrator The content of this blog is my sole responsibility as an independent Stampin' Up! demonstrator and the use of, and content of, the classes, services, or products offered on this blog is not endorsed by Stampin' Up!

Quilt cards!!

Beautiful Quilt cards using Stampin'Up! DSP I posted these a few weeks back on my facebook page and finally got around to making a video...