12/10/2021
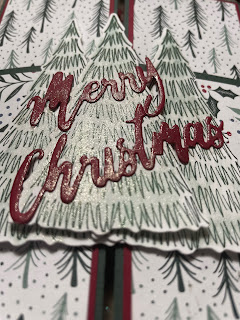
December 2021 Stray Ducklings Blog Waddle
Welcome to our December 2021 Stray Ducklings Blog Waddle!
12/09/2021
Amazing Fold Flat Giftbag using Stampin'UP! DSP!!!
These are the greatest gift bags!!! Made with Stampin'UP! DSP AND fold flat for storage!! I made these for my team members for their Christmas Gifts this year and cannot wait to see them recieve them!!!
Here are the measurements for this bag -
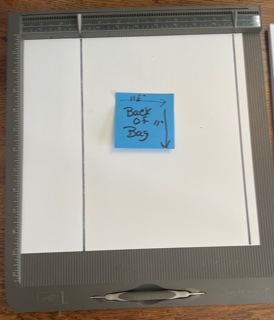
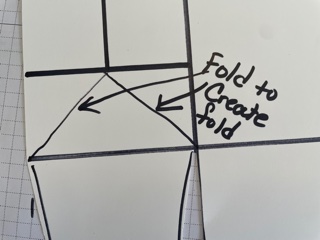
Below are pictures of the scoring, however, it is easier to see all the details on this video!
FOR THE SCORING ON THIS BAG
FOR THE FRONT OF THE BAG:
FOR THE BACK OF YOUR BAG:
Here are a few more of the bags I made!
11/26/2021
Wobble Wobble Chirstmas Card!!
So fun to make and loved by all that recieve it!!!!
I made this card using the Gingerbread & Peppermint suite in our July-December 2021 mini catalog! This is such a fun and amazing suite with so many cute pieces included. This is also one of those suites that has a DSP that you can have do all the work for you!!!!
The masurements for this card are
Here is a step by step video
WHICH ONE? 1---- 2---- OR 3!!
DISCLOSURE
Images © Stampin' Up! 2011 & Debra Widener
Debra Widener, Independent Stampin' Up! Demonstrator The content of this blog is my sole responsibility as an independent Stampin' Up! demonstrator and the use of, and content of, the classes, services, or products offered on this blog is not endorsed by Stampin' Up!
11/24/2021
Merry Christmas Shaker Card!!
For this card I used the Holly Jolly Wishes stamp set and paper from the Whimsy & Wonder DSP pack also from the July-Dec mini catalog!
The paper measurements for this card are
Blushing Bride card base 5-1/2" x 8-1/2" and scored at 4-1/4"
DSP piece measures 4-3/4" x 3-1/2"
window sheet cut to 5" x 3-3/4"
The frame for this was cut from the silver foil specialty paper using the stitched rectangle framelets. I used the largest and then skip one and use the 3rd die to create the frame.
I used tear and tape to attach my window sheet to my frame and then attached the foam adhesive strips to the back of this to create the depth to be able to add the sequins and allow them to move freely. The sequins I used for this card are the subtle shimmer sequins from the mini catalog.
Here is the shopping list for the items I used!
11/16/2021
11/10/2021
November 2021 Stray Ducklings Blog Waddle!!!
WELCOME TO OUR NOVEMBR 2021 STRAY DUCKLINGS BLOG WADDLE!! I LOVE THIS TIME OF YEAR WHEN WE CAN FOCUS ON WINTER AND CHRISTMAS! I LOVE MAKING A CARD THAT FRIENDS AND FAMILY CAN DISPLAY!!
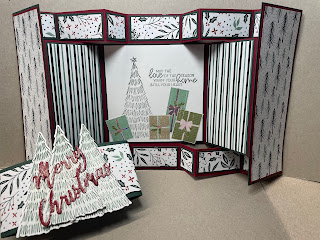
My card for this month fearures our Whimsical Tree Bundle from our July - December 2021 mini catalog. I have put a different twist on this set by combining it with more traditional colors and a great fancy fun fold!!!! I hope you enjoy it!!!
I started this card with a piece of Cherry Cobbler from our 12 x 12 Regals cardstock pack. I cut it down to 6" x 12". Then line the short end up at the 1" mark and cut from 1" to 5" and again from 7" to 11". Now flip your paper over and do the exact same cuts to the other side. Refer to pictures below.
After cutting now to score. You need to turn your paper with long side at top now and score all the way down at 2", 4". 8" and 10".
Now we are going to score again but this time ONLY TO THE CUT LINES AT 1", 5", 7" AND 11" AND TURN THE PAPER OVER AND REPEAT ON OTHER SIDE!!
Now burmish your score marks. First do the long ones then go back and fold and burmish your shorter score marks.
Now to cut the pieces for decorating your card. You need to cut the following piecees.
Basic White 2 squares measuring 3-3/4"
Cherry Cobbler - outside panel - 6" x 2"
Evening Evergreen -
10" x 2" - belly band
3-7/8" x 3-7/8" (2) - inside square
5-7/8" x 1-7/8" (2)- outside panels
3-7/8" x 1-7/8" (2) inside panesl
1-7/8" x 7/8" (6) - top and bottom pieces
7/8" x 7/8" (8) - top and bottom pieces
DSP I used Tidings of Christmas 6 x 6 pack
5" x 1-3/4"" (2) - belly band (I cut two pieces because I was using 6x6 DSP. If using 12x12 DSP you could cut one piece that measures 10" x 1-3/4"")
5-3/4"" x 1-3/4"" (2) - outside panels
3-3/4" x 1-3/4" (2) - inside panels
1-3/4" x 3/4" (6) - top and bottom pieces
3/4" x 3/4" (8) - top and bottom pieces
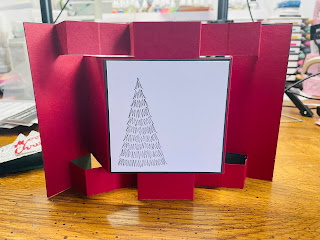
I stamped a tree and greeting from the Whimsical Tree bundle in Evening Evergreen and then fussy cut the Christmas presents and Star for the top of the tree out of the Whimsy and Wonder DSP. I also stamped a tree on the back panel and left the rest of it blank to have space to sign and write a message.
For the belly band I stamped three trees and die cut them out with the dies from the Whimsical Tree bundle, I then cut Merry Christas out of Cherry Cobbler using our Word Wishes Dies.
Once you have all your pieces layered you are ready to assemle your card. The outside panels only attach to the middle section so be sure to put the glue on the card base and not on the back of your panel! (as pictured)Then continure placing your pieced and finishing your embellishing.
Please follow these links to see what the other Stray Ducklings have done!!!
Here is a list of the supplies I used to make this card!
DISCLOSURE
Images © Stampin' Up! 2011 & Debra Widner
Debra Widener, Independent Stampin' Up! Demonstrator The content of this blog is my sole responsibility as an independent Stampin' Up! demonstrator and the use of, and content of, the classes, services, or products offered on this blog is not endorsed by Stampin' Up!
10/20/2021
Celebrate Sunflowers Fancy Fold
Let's Celebrate with this Celebrate Sunflowers card!!
For this beautiful card I used both the Celebrate Sunflowers Bundle and the A Grand Kid stamp set. This is a special card for my niece who recently received the Sunflower Award at the Hospital where she works.
The measurements for this card are:
Early Expresso card base measuring 5 - 1/2" x 8 - 1/2" and score at 2 - 1/8" and 4 - 1/4"
You also need
2 pieces of Cajun Craze measuring 4 - 1/8" x 5 - 3/8"
2 pieces of Very Vanilla measuring 4" x 5 - 1/4".
You will need additional pieces of daffodil delight and early expresso to cut your sunflower from for the front of your card.
For the greeting you will need a piece of crumb cake measuring 4" x 1-1/2" and a piece of very vanilla measuring 4" x 1-1/4".
For complete instruction on making this card here is a video:
10/10/2021
October 2021 Stampin Stray Ducklings Blog Waddle!!
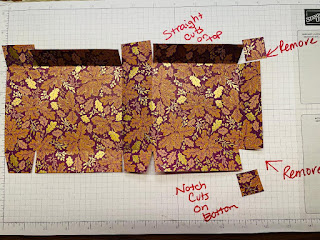
Welcome to our Blog Waddle!!Our theme this month is Thanks. We have so much to be thankful for. I want to show all my friends and family just how much I love and appreciate all of them. So my project is a gift I plan to share with many.These cute little bags can be filled with chocolates or any other item that you would like your friends and family to have. The Blackberry Beauty DSP used to make these is the most beautiful paper with its multicolor leaves and golden accents. The sentiment from Pretty Pumpkins stamp set is perfect to let everyone know how thankful you are for them.To make this you start with a half of a sheet of DSP measuring 6" x 12" and score that on the long side at 1 & 1/2", 5 & 1/2", 7" and 11". |
DISCLOSURE
Images © Stampin' Up! 2011 & Debra Widener
Debra Widener, Independent Stampin' Up! Demonstrator The content of this blog is my sole responsibility as an independent Stampin' Up! demonstrator and the use of, and content of, the classes, services, or products offered on this blog is not endorsed by Stampin' Up!
Quilt cards!!
Beautiful Quilt cards using Stampin'Up! DSP I posted these a few weeks back on my facebook page and finally got around to making a video...

-
H A P P Y H A L L O W E E N !! Welcome to out September 2021 Stampin' Stray Ducklings Blog Waddle!! Our theme this month is fall and Ha...
-
Stampin' Stray Ducklings blog waddle April 2021 Welcome to our Stampin' Stray Ducklings monthly Blog Waddle! Our theme this month...
-
Welcome to our Blog Waddle!! Our theme this month is Thanks. We have so much to be thankful for. I want to show all my friends and family ...


