11/26/2021

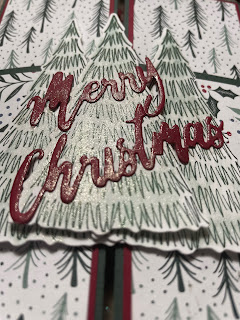
 Wobble Wobble Chirstmas Card!!

So fun to make and loved by all that recieve it!!!!


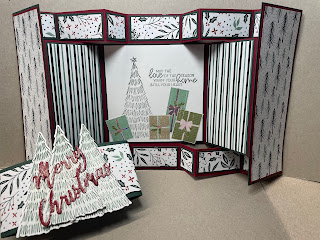
I made this card using the Gingerbread & Peppermint suite in our July-December 2021 mini catalog! This is such a fun and amazing suite with so many cute pieces included. This is also one of those suites that has a  DSP that you can have do all the work for you!!!!


The masurements for this card are 


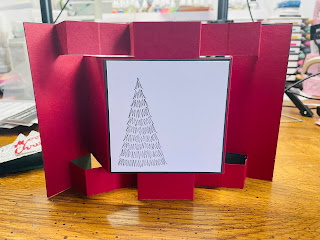
Real Red Card Base measuring 8-1/2" x 5-1/2" and scored at 4-1/4"
The DSP I cut to 5-1/2" x 4-1/4" to cover the entire card base
Old Olive layer is 5-1/2" x 2"
Basic White layer is 5-1/4" x 1-3/4"
Layers for the inside of the card are -
Old Olive 5-1/4" x 4
Basic White 5" x 3-3/4"

For the greeting I cut it from the square die in the stitched layering rectangles dies and I cut the old olive piece to go behind it at 1-7/8" x 1-1/2"

The ornaments were cut from the DSP with the dies that are in the bundle 

The old olive decorative strips were cut using a die in the bundle too.


Here is a step by step video


I attached the middle ornament with a bobble which I purchased at a local craft store. 


WHICH ONE? 1---- 2---- OR 3!!     


DISCLOSURE

Images © Stampin' Up! 2011 & Debra Widener
Debra Widener, Independent Stampin' Up! Demonstrator The content of this blog is my sole responsibility as an independent Stampin' Up! demonstrator and the use of, and content of, the classes, services, or products offered on this blog is not endorsed by Stampin' Up!

11/24/2021

 Merry Christmas Shaker Card!


For this card I used the Holly Jolly Wishes stamp set  and paper from the Whimsy & Wonder DSP pack also from the July-Dec mini catalog! 


The paper measurements for this card are 

Blushing Bride card base 5-1/2" x 8-1/2" and scored at 4-1/4"
DSP piece measures 4-3/4" x 3-1/2"
window sheet cut to 5" x 3-3/4"
The frame for this was cut from the silver foil specialty paper using the stitched rectangle framelets. I used the largest and then skip one and use the 3rd die to create the frame. 


I used tear and tape to attach my window sheet to my frame and then attached the foam adhesive strips to the back of this to create the depth to be able to add the sequins and allow them to move freely. The sequins I used for this card are the subtle shimmer sequins from the mini catalog. 


Here are some additional shaker cards I made!


Here is the shopping list for the items I used!


11/16/2021

 Seasonal Sale
Stock up and Save!!
November 16-18 ONLY

10% off cardstock
15% off ink pads
20% off dies


11/10/2021

November 2021 Stray Ducklings Blog Waddle!!!


 WELCOME TO OUR NOVEMBR 2021 STRAY DUCKLINGS BLOG WADDLE!! I LOVE THIS TIME OF YEAR WHEN WE CAN FOCUS ON WINTER AND CHRISTMAS! I LOVE MAKING A CARD THAT FRIENDS AND FAMILY CAN DISPLAY!! 


My card for this month fearures our Whimsical Tree Bundle from our July - December 2021 mini catalog. I have put a different twist on this set by combining it with more traditional colors and a great fancy fun fold!!!! I hope you enjoy it!!!


I started this card with a piece of Cherry Cobbler from our 12 x 12 Regals cardstock pack. I cut it down to 6" x 12". Then line the short end up at the 1" mark and cut from 1" to 5" and again from 7" to 11". Now flip your paper over and do the exact same cuts to the other side. Refer to pictures below.


 After cutting now to score. You need to turn your paper with long side at top now and score all the way down at 2", 4". 8" and 10". 


Now we are going to score again but this time ONLY TO THE CUT LINES  AT 1", 5", 7" AND 11" AND TURN THE PAPER OVER AND REPEAT ON OTHER SIDE!!


Now burmish your score marks. First do the long ones then go back and fold and burmish your shorter score marks. 


Now to cut the pieces for decorating your card. You need to cut the following piecees. 
Basic White 2 squares measuring 3-3/4"

Cherry Cobbler - outside panel - 6" x 2"

Evening Evergreen -
10" x 2" - belly band
3-7/8" x 3-7/8" (2) - inside square
5-7/8" x 1-7/8"  (2)- outside panels
3-7/8" x 1-7/8" (2) inside panesl
1-7/8" x 7/8" (6) - top and bottom pieces
7/8" x 7/8" (8) - top and bottom pieces

DSP I used  Tidings of Christmas 6 x 6 pack
5" x 1-3/4"" (2) - belly band (I cut two pieces because I was using 6x6 DSP. If using 12x12 DSP you could cut one piece that measures 10" x 1-3/4"") 
5-3/4"" x 1-3/4"" (2) - outside panels
3-3/4" x 1-3/4" (2) - inside panels
1-3/4" x 3/4" (6) - top and bottom pieces
3/4" x 3/4" (8) - top and bottom pieces


I stamped a tree and greeting from the Whimsical Tree bundle in Evening Evergreen and then fussy cut the Christmas presents and Star for the top of the tree out of the Whimsy and Wonder DSP. I also stamped a tree on the back panel and left the rest of it blank to have space to sign and write a message. 


For the belly band I stamped three trees and die cut them out with the dies from the Whimsical Tree bundle, I then cut Merry Christas out of Cherry Cobbler using our Word Wishes Dies.

Once you have all your pieces layered you are ready to assemle your card. The outside panels only attach to the middle section so be sure to put the glue on the card base and not on the back of your panel! (as pictured)Then continure placing your pieced and finishing your embellishing. 


And you know I always have to add that bling so added some Wink of Stella to the belly band!!!


Please follow these links to see what the other Stray Ducklings have done!!!


Kim Baker 
Sheryl Diemer 
Nancy Legate 
                                Debbie Widener - YOU ARE HERE
Lori Helvick 
Sue Boerner

Here is a list of the supplies I used to make this card! 


DISCLOSURE

Images © Stampin' Up! 2011 & Debra Widner
Debra Widener, Independent Stampin' Up! Demonstrator The content of this blog is my sole responsibility as an independent Stampin' Up! demonstrator and the use of, and content of, the classes, services, or products offered on this blog is not endorsed by Stampin' Up!

Quilt cards!!

Beautiful Quilt cards using Stampin'Up! DSP I posted these a few weeks back on my facebook page and finally got around to making a video...