11/10/2021

November 2021 Stray Ducklings Blog Waddle!!!


 WELCOME TO OUR NOVEMBR 2021 STRAY DUCKLINGS BLOG WADDLE!! I LOVE THIS TIME OF YEAR WHEN WE CAN FOCUS ON WINTER AND CHRISTMAS! I LOVE MAKING A CARD THAT FRIENDS AND FAMILY CAN DISPLAY!! 
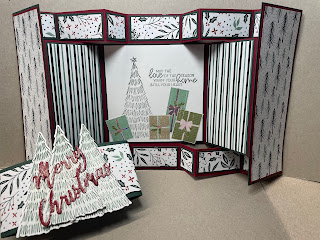


My card for this month fearures our Whimsical Tree Bundle from our July - December 2021 mini catalog. I have put a different twist on this set by combining it with more traditional colors and a great fancy fun fold!!!! I hope you enjoy it!!!


I started this card with a piece of Cherry Cobbler from our 12 x 12 Regals cardstock pack. I cut it down to 6" x 12". Then line the short end up at the 1" mark and cut from 1" to 5" and again from 7" to 11". Now flip your paper over and do the exact same cuts to the other side. Refer to pictures below.


 After cutting now to score. You need to turn your paper with long side at top now and score all the way down at 2", 4". 8" and 10". 


Now we are going to score again but this time ONLY TO THE CUT LINES  AT 1", 5", 7" AND 11" AND TURN THE PAPER OVER AND REPEAT ON OTHER SIDE!!


Now burmish your score marks. First do the long ones then go back and fold and burmish your shorter score marks. 


Now to cut the pieces for decorating your card. You need to cut the following piecees. 
Basic White 2 squares measuring 3-3/4"

Cherry Cobbler - outside panel - 6" x 2"

Evening Evergreen -
10" x 2" - belly band
3-7/8" x 3-7/8" (2) - inside square
5-7/8" x 1-7/8"  (2)- outside panels
3-7/8" x 1-7/8" (2) inside panesl
1-7/8" x 7/8" (6) - top and bottom pieces
7/8" x 7/8" (8) - top and bottom pieces

DSP I used  Tidings of Christmas 6 x 6 pack
5" x 1-3/4"" (2) - belly band (I cut two pieces because I was using 6x6 DSP. If using 12x12 DSP you could cut one piece that measures 10" x 1-3/4"") 
5-3/4"" x 1-3/4"" (2) - outside panels
3-3/4" x 1-3/4" (2) - inside panels
1-3/4" x 3/4" (6) - top and bottom pieces
3/4" x 3/4" (8) - top and bottom pieces


I stamped a tree and greeting from the Whimsical Tree bundle in Evening Evergreen and then fussy cut the Christmas presents and Star for the top of the tree out of the Whimsy and Wonder DSP. I also stamped a tree on the back panel and left the rest of it blank to have space to sign and write a message. 

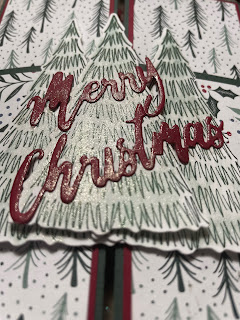
For the belly band I stamped three trees and die cut them out with the dies from the Whimsical Tree bundle, I then cut Merry Christas out of Cherry Cobbler using our Word Wishes Dies.

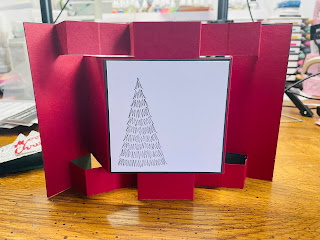
Once you have all your pieces layered you are ready to assemle your card. The outside panels only attach to the middle section so be sure to put the glue on the card base and not on the back of your panel! (as pictured)Then continure placing your pieced and finishing your embellishing. 


And you know I always have to add that bling so added some Wink of Stella to the belly band!!!


Please follow these links to see what the other Stray Ducklings have done!!!


Kim Baker 
Sheryl Diemer 
Nancy Legate 
                                Debbie Widener - YOU ARE HERE
Lori Helvick 
Sue Boerner

Here is a list of the supplies I used to make this card! 


DISCLOSURE

Images © Stampin' Up! 2011 & Debra Widner
Debra Widener, Independent Stampin' Up! Demonstrator The content of this blog is my sole responsibility as an independent Stampin' Up! demonstrator and the use of, and content of, the classes, services, or products offered on this blog is not endorsed by Stampin' Up!

10/20/2021

Celebrate Sunflowers Fancy Fold

 Let's Celebrate with this Celebrate Sunflowers card!!

For this beautiful card I used both the Celebrate Sunflowers Bundle and the A Grand Kid stamp set. This is a special card for my niece who recently received the Sunflower Award at the Hospital where she works. 


The measurements for this card are:

Early Expresso card base measuring 5 - 1/2" x 8 - 1/2" and score at 2 - 1/8" and 4 - 1/4"

You also need 

2 pieces of Cajun Craze measuring 4 - 1/8" x 5 - 3/8" 

2 pieces of  Very Vanilla measuring 4" x 5 - 1/4". 

You will need additional pieces of daffodil delight and early expresso to cut your sunflower from for the front of your card.

 For the greeting you will need  a piece of  crumb cake measuring 4" x 1-1/2" and a piece of  very vanilla measuring 4" x 1-1/4".


For complete instruction on making this card here is a video:


10/10/2021

October 2021 Stampin Stray Ducklings Blog Waddle!!


Welcome to our Blog Waddle!!

Our theme this month is Thanks. We have so much to be thankful for. I want to show all my friends and family just how much I love and appreciate all of them. So my project is a gift I plan to share with many. 


These cute little bags can be filled with chocolates or any other item that you would like your friends and family to have. The Blackberry Beauty DSP used to make these is the most beautiful paper with its multicolor leaves and golden accents. The sentiment from Pretty Pumpkins stamp set is perfect to let everyone know how thankful you are for them. 


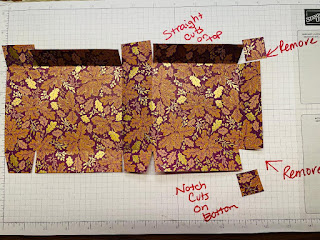
To make this you start with a half of a sheet of DSP measuring 6" x 12" and score that on the long side at  1 & 1/2", 5 & 1/2", 7" and 11".
You then turn it and score the short side at 1" and 5". 


You then cut using your paper snips on short score marks, removing the right corners and notching out the other score marks on the bottom. 


Next you can fold down and fasten the top pieces showing the other side of your paper! 


Now, turn your paper upside down and fold back the side piece from where you cut out the square and add adhesive to the side piece and fold the box over to attach the sides. Then complete your box by fastening the rest of the bottom together and folding down the rest of the top flap! 


Once you have it put together you are ready to decorate it!! I heat embossed my greeting and added a bow


Hope you enjoy this project. I know my friends and family are going to love it!!


 Check out the other ducklings who are waddling this month!! So many beatiful cards and projects!!


Debbie Widener--YOU ARE HERE


DISCLOSURE

Images © Stampin' Up! 2011 & Debra Widener

Debra Widener, Independent Stampin' Up! Demonstrator The content of this blog is my sole responsibility as an independent Stampin' Up! demonstrator and the use of, and content of, the classes, services, or products offered on this blog is not endorsed by Stampin' Up!

9/27/2021

Plentiful Plants Double Gatefold Card


Double Gatefold Plentiful Plant Card!

Who doesn't love making or receiving a fun fold like this!!


I started this card with a Just Jade card base measuring 5 & 1/2" x 11". I score this on the long side at 1 &1/4", 3 & 3/8", 7 & 5/8" and 9 & 3/4". Then you fold on each of the score marks in fan fold fashion to give you the base for your card! You now need to cut 2 pieces of the Bloom Where You Are Planted DSP @ 1 & 1/8" x 5 & 3/8". These are the two pieces that will go on the smaller flaps. You also need 4 pieces of DSP cut at 2" x 5 & 3/8". I used two different patterns for these. Two go on the card base next to the smaller pieces and the other two go on the corresponding section on the back of the card. These two will show on the front when the card is folded. 

For the inside piece I cut a piece of basic white at 4 & 1/8" x 5 & 3/8". I then stamped my greeting and fussy cut my plant from the Bloom Where You Are Planted DSP that is part of this suite!!! So easy and adds so much! 

The cinnamon cider belly band measures 1" x 11". After wrapping that and fastening it around my folded card base, I then cut a piece of basic white out using the Stitched So Sweetly Dies. I stamped my greeting towards the bottom of this piece and then die cut the flower pot and plant out of the sheets in the Bloom Where You Are Planted  DSP! 


I love the way this card turned out. 


I hope you enjoyed this card today!!

Here is a list of my supplies I used for making this card! 


9/23/2021

Quick and Easy Halloween Cards


 Halloween Is just around the corner and here are a few more quick and easy cards!!


These Halloween cards are made using the Frightfully Cute Bundle and the Cute Halloween 6 x 6 Designer Series Paper. Both available now in our July - December 2021 mini catalog!! 

The measurements for this card are Flirty Flamingo card base at 5 & 1/2" x 8 & 1/2" and scored at 4 & 1/4".  The basic black layer measures 5 &1/4" x 4".  I cut the DSP to 5 & 1/8" x 3 & 7/8".  I used a piece of the Black and White Gingham ribbon also found in the mini catalog. The greeting on the front of the card is heat embossed in black and then I added a couple of the Matte enamel dots to finish it off.


To finish the inside of the card and pull the entire card together I again added a layer of basic black measuring 5 & 1/4" x 4". The white layer measures 5 & 1/8" x 3 & 7/8" and was stamped with Happy Halloween to you from the stamp set. 

Here is a video to show just how easy this card is!!!


This card was so quick and easy and with all the patterns ad colors in the DSP you can easily make many cards for this Halloween. 


DISCLOSURE

Images © Stampin' Up! 2011 & Debra Widener
Debra Widener, Independent Stampin' Up! Demonstrator The content of this blog is my sole responsibility as an independent Stampin' Up! demonstrator and the use of, and content of, the classes, services, or products offered on this blog is not endorsed by Stampin' Up!

9/10/2021

Stampin' Stray Ducklings September Blog Waddle!


H
APPY 

HALLOWEEN!!


Welcome to out September 2021 Stampin' Stray Ducklings Blog Waddle!! Our theme this month is fall and Halloween! With 9 grandbabies I have to make a lot of  Halloween cards and treats so I like to get started early!! I love how this card turned out! 


This is an awesome bundle for Halloween. This Frightfully Cute Bundle (pictured below) is on page 52 of our August to December 2021 mini catalog. With this stamp set and die set you can complete almost any Halloween project you need to do. And as always you save 10% by buying the bundle! 


Sometimes the cutest and easiest cards are made using DSP for your layers or accents. For this card I  used the Cute Halloween 6x6 DSP found on page 51 of the mini catalog. 
I used the stamparatus to stamp the witch onto the DSP. The reason for this was so I could stamp it several times to make it darker and cover the lines in the DSP without having to line it up. The great thing about the stamparatus is that it stays in the  same spot so you can stamp over and over and not have to worry about lining it up!!! As I have said before...in my opinion this is a  must have tool!!! 


Here are a list of the papers and measurements that I used for this card.  I started with a Pumpkin Pie card base measuring 5 & 1/2" x 8 & 1/2" and scored at 4 & 1/4". My first layer was our basic white measuring 5 & 1/4" x 4". I cut two of these so I had a layer for the inside of  my card too. The pieces of DSP were cut at 3 & 7/8" x 2 & 1/2". I also cut a strip of basic black 1/2" x  4" to cover the space between my DSP's.  For die-cutting the spider web and the greeting with my Stampin' cut & emboss  machine I used scrap pieces. To attach the greeting to the spider web and the web to the card I used stampin dimensionals. 


I also finished my envelope by stamping a witch on the front of the envelope and covered the flap with another piece of the DSP. It helps to pull it all together and makes for a completed project! 
I hope you enjoyed my card!  


Thank you for stopping by!! 
Here is a list of all of our waddling stray ducklings!! 
Check out all of the beautiful creations they have created!!!!


Here is a list of supplies that I used on this card. If you are in need of a catalog just let me know and I will gladly get one to you!!! 


8/24/2021

Hello Friend

 The 2021-2023 In Colors are amazing!!


For this card I used the new 2021-2023 In Color Shimmer Vellum and 2021-2023 In color Jewels. 


I started with a thick white card base cut at 5&1/2" x 8" and scored at 4&1/4". 

For my first layer I cut a piece of basic black cardstock at 5&1/4" x 4". 

 For the next layer I used a piece of basic white 5&1/8" x 3&7/8" and embossed it with the tasteful textures embossing folder to give just a bit of texture. 


The DSP I used on both the front of the card and the flap of the envelope came from the hostess pack called Pattern Party! You can earn this pack for free when you have a qualifying party!! The dsp for the front of the card measures 2&1/4" x 4". 

The circle greeting layers were cut from our layering circles dies and the greeting I used was from the stamp set Welcoming Woods from our July-December 2021 mini. 

I cut the butterflies out of the new in color shimmer vellum with the brilliant wings dies!! It has a glitter to it and when you cut the butterflies they are just beautiful! I attached them using mini dimensional so they look like they are fluttering!


This card can be changed for any occasion simply by changing the greeting and the color of the butterflies. 

Both the vellum and the jewels come in all 5 of the in colors!!!


Hope you enjoyed this card. 


Below is a list of supplies I used for this card! Please let me know if you need a catalog or if I can place an order for you!


DISCLOSURE

Images © Stampin' Up! 2011 & Debra Widener
Debra Widener, Independent Stampin' Up! Demonstrator The content of this blog is my sole responsibility as an independent Stampin' Up! demonstrator and the use of, and content of, the classes, services, or products offered on this blog is not endorsed by Stampin' Up!

Quilt cards!!

Beautiful Quilt cards using Stampin'Up! DSP I posted these a few weeks back on my facebook page and finally got around to making a video...